Primitive Technology: Cord drill and Pump drill

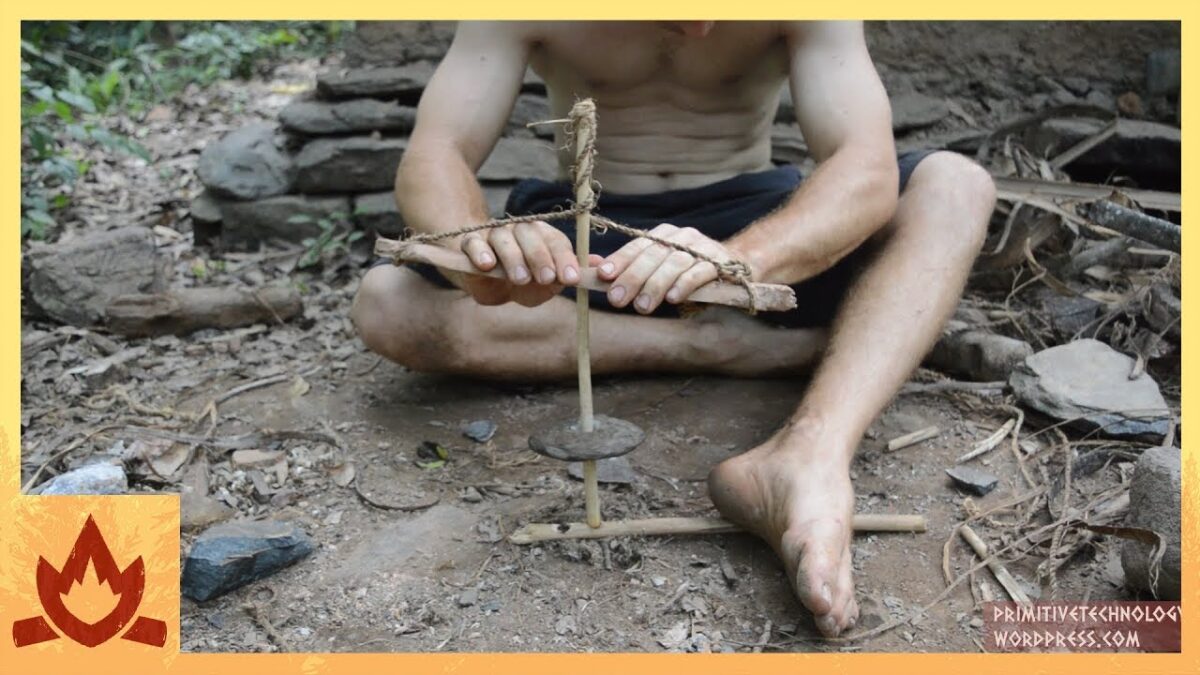
I made a cord drill and then upgraded it to a pump drill. A cord drill is basically a spindle with a fly wheel attached so it looks like a spinning top. the middle of a piece of cord is then put into a notch at the top of the spindle. The ends of the cord are then wrapped around the spindle and then pulled quickly outwards causing the drill to spin. The momentum of the fly wheel causes the cord to wrap back around the spindle in the other direction. When it stops the cords are pulled outwards again and the drill spins in the other direction.
I made the first one with a stone flywheel then made fire with it in the same way I make fire with fire sticks. Then I made and fired some clay fly wheels, made another drill with one of the fly wheels and fitted a stone drill bit to the end. This one I use for drilling holes in wood.
I used the new drill to make a hole in a piece of wood. I then put the spindle of the original cord drill through the hole in the wood, tied the ends of the cord onto the piece of wood and it became a pump drill. The cords were wrapped round the spindle as normal but now a pumping action of the wooden cross bar created the same action.
This was an interesting project. For fire making I’d stick to fire sticks because the equipment is easier to make. But for people with soft hands they could use the cord drill as it won’t give them blisters. It should be added that the pump drill actually took longer than the cord drill (cord: 32 seconds, pump 1 min 30 seconds -the pump drill scene was edited down to make it watchable). The pump drill had more moving parts and was constantly having problems. As a fire making method I’d choose the cord drill over the pump drill unless all the parts were well made.

The main purpose I’d use these tool for is drilling holes rather than fire making. It was reasonably good but the stone bits I made could be improved and their attachment to the shaft also needs some thought. If the bit loosens and gets off axis slightly the whole thing wobbles.
These drills are impressive inventions and show potential for carpentry use later on.

WordPress: https://primitivetechnology.wordpress.com/
Patreon page: https://www.patreon.com/user?u=2945881&ty=h
I have no face book page. Beware of fake pages.

Primitive Technology: Bow and Arrow

I made this bow and arrow using only primitive tools and materials.The bow is 1.25 m (55 inches) long and shoots 60 cm (2 feet) long arrows. I don’t know the draw weight – safe to say greater than 15 kg (35 pounds) perhaps? The stave was made from a tree ,Northern Olive (Chionanthus ramiflora), that was cut with a stone axe and split in half with a stone chisel. One half was used for the bow and was cut to a length of 1.25 m (50 inches). The limbs of the bow were carved with various stone blades so that the limbs tapered in width, and to a lesser extent depth, towards the tips. The middle of the bow was narrowed in width to form a handle about 12.5 cm (5 inches) long.
The string was made from the inner bark of a fibrous tree. It was separated into thin strips and left to dry. Then it was twisted into cordage.
Arrows were made of the same wood as the bow and were 60 cm (2 feet) long. A notch was carved into the back to accept the bow string. They were fletched with bush turkey feathers picked up from the ground (no turkeys were harmed in the making of this video). A feather was split in half and cut into 3 lengths then resin and bark fiber attached the fletching on to the arrows. The tip of the arrow was fire hardened and sharpened to a point. The fletching was trimmed using a hot coal. Each arrow took about an hour to make. A quiver was made of bark to hold the arrows. Importantly, the quiver was worn on the back in the historically accurate style of native American and African archers- not on the hip like medieval European archers (see back quiver: https://en.wikipedia.org/wiki/Quiver ).
I cleared a shooting range with a semi rotten log as a target instead of a hay bale. At 10 meters the accuracy was better than 50 % for this narrow target and the arrows stuck into the wood enough so that they were difficult to pull out. The bow was durable, shooting about 200-300 times with the string breaking only 3 times. I made a back up string and repaired them by splicing the ends back together.
In conclusion this was an easy bow to make. The short design makes it easy to find a straight piece of wood for the stave. A short string is also easy to make and short arrow shafts are easy to find. Short bows shoot fast and are easy to carry in thick forest. The dimensions of the bow were based on those given in the SAS Survival Handbook by john Lofty Wiseman. but instead of carving it from a stave from the start, I split the stave and then carved it. I think this requires less time, effort and skill. It also gives a flat bow design that’s unlikely to break. It does require wood that doesn’t twist much when split though.
Wordpress: https://primitivetechnology.wordpress.com/
Patreon page: https://www.patreon.com/user?u=2945881&ty=h
I have no face book page. Beware of fake pages.

Primitive Technology: Tiled Roof Hut

I built this tiled roof hut in the bush using only primitive tools and materials. The tools I used have been made in my previous videos. It should be pointed out that I do not live in the wild and that this is just a hobby. It should be obvious to most that this is not a survival shelter but an experiment in primitive building technology.
To cut and carve wood I used the celt stone axe and stone chisel made in this video. To carry water and make fire I used pots and fire sticks made in this video. Finally, to store fire wood and dry, unfired tiles, I used the wood shed built in this video.
The wooden frame was built with a 2X2m floor plan and a 2m tall ridge line with 1m tall side walls. 6 posts were put into the ground 0.25 m deep. The 3 horizontal roof beams were attached to these using mortise and tenon joints carved with a stone chisel. The rest of the frame was lashed together with lawyer cane strips. The frame swayed a little when pushed so later triangular bracing was added to stop this. Also when the mud wall was built, it enveloped the posts and stopped them moving altogether.
A small kiln was built of mud from the ground and a perforated floor of clay from the creek bank. It was only 25 cm internal diameter and 50 cm tall. Clay was dug, broken tiles (from previous batches) were crushed and added to it as grog and it was mixed thoroughly.This clay was pressed into rectangular moulds made from strips of lawyer cane to form tiles. Wood ash prevented the clay sticking to the stone. 20 tiles were fired at a time. 450 flat tiles and 15 curved ridge tiles were made with only a few breakages. 26 firings were done in all and the average firing took about 4 hours. The fired tiles were then hooked over the horizontal roof battens.
An underfloor heating system was built into one side of the hut to act as a sitting/sleeping platform in cold weather. This was inspired by the Korean Ondol or “hot stone”. A trench was dug and covered with flat stones with a firebox at one end and a chimney at the other for draft. The flames travelled beneath the floor heating it. After firing it for a while the stones stay warm all night with heat conducted directly to the sleeping occupant and radiating into the room.
The wall was made of clayey mud and stone. A stone footing was laid down and over this a wall of mud was built. To save on mud, stones were included into later wall courses. The mud was dug from a pit in front of the hut and left a large hole with a volume of about 2.5 cubic metres.
The finished hut has a swinging door made of sticks. The inside is dark so I made a torch from tree resin. A broken tile with resin on it acts as a small lamp producing a lot of light and little smoke. The end product was a solid little hut, that should be fire and rot resistant. The whole project took 102 days but would have taken 66 days were it not for unseasonal rain. For a more in depth description see my blog (https://primitivetechnology.wordpress.com/).

WordPress: https://primitivetechnology.wordpress.com/
Patreon page: https://www.patreon.com/user?u=2945881&ty=h
I have no face book page. Beware of fake pages.